How to moor a boat in 4 simple steps
If you’ve decided to go for a Le Boat boating holiday, you’re probably thinking that one of the things you’ll need to do at some point is moor your boat. At Le Boat, no previous boating experience or licence is required to enjoy your holiday fully, and we’ll show you the ropes before your departure. However, we understand you might still be hesitant; after all, mooring a boat safely is a key skill for anyone spending time on the water.
Whether you’re new to boating or revisiting the mooring technique, approaching a quay, bank, or mooring point can feel tricky at first. But with a little preparation and the right knowledge, it soon becomes second nature. So, how to moor a boat?
From selecting the right spot to tying the perfect knot, in this blog, we’ll take you through four simple steps to moor your boat easily. You’ll gain practical insights and the necessary confidence that make docking less stressful and more enjoyable.
In this article

What’s the difference between mooring and anchoring?
Before we start explaining the mooring process in detail, it’s worth clarifying the difference between mooring and anchoring.
- Mooring means securing your boat to a bank, quay, or bollard, which is what you’ll do on a Le Boat holiday.
- Anchoring involves dropping an anchor to hold the boat in place, a technique more common on lakes or open water.
On our waterways, mooring is the standard way to stop and explore all the gems you find along the way during your boating holiday!
Before setting off: crew briefing, roles, and mooring equipment
When you arrive at the base, we carry out a full pre-departure briefing that both you, as the captain, and your crew must attend; if you don’t, you won’t be able to set off. During this briefing, you’ll receive the Captain’s handbook at check-in, with step-by-step instructions, safety tips, and advice for mooring a boat confidently, plus you’ll have the chance to define clear roles so everyone on board knows exactly what to do:
- The Captain stays at the helm and controls speed and direction.
- Rope handler 2 takes care of the stern or assists from the bank to guide the boat into position.
- Rope handler 1 manages the bow line and steps ashore to secure the front of the boat.

During the briefing, we’ll also show you the mooring equipment provided and how to use it safely:
- Ropes (lines): needed for tying the boat to mooring points.
- Fenders: used to protect the hull from bumps against banks or quays.
- Mooring stakes/pins: handy to secure lines on certain banks or grassy areas.
- Hammer: required to drive stakes/pins securely into the ground when needed.
A short, well-organised briefing ensures teamwork, keeps everyone safe, and makes the whole mooring process much smoother and easier.
1. Choosing the best spot to moor a boat
When it comes to boat mooring, selecting a suitable spot is the first and most important step in ensuring a safe experience.
Our best tips for choosing a mooring location:
- Avoid high-traffic zones: areas too close to locks or bridges can increase the risk of collisions or sudden changes in water movement.
- Watch out for obstacles: tree stumps, submerged rocks, or floating debris could damage your boat. Being aware of these hazards allows you to make minor adjustments to your approach or even choose a safer location.
- Consider water levels: tides, rain, and upstream releases can make river and canal levels fluctuate significantly. This is especially important to bear in mind when mooring overnight, to avoid your boat resting on the riverbed or drifting away.
- On rivers, always aim to moor facing upstream: positioning your boat with the bow (front) pointed into the current reduces strain on the ropes and helps the boat remain stable, even if the current becomes stronger.
Forbidden mooring spots
To keep your boat, yourself, and your crew secure, we can’t stress enough not to moor in any of the following areas:
- Near lock entrances
- Under bridges
- At blind bends
- Opposite turning points
2. Prepare yourself and your crew for mooring
Preparation is key to mooring your boat smoothly. Taking a few extra minutes to plan the manoeuvre often makes the difference between a calm docking and a stressful scramble. Before approaching your chosen spot, make sure every member of your crew understands their role in the mooring process, as agreed during the pre-departure briefing:
- Who will handle the bow line?
- Who will manage the stern?
- Who will assist with fenders or lines?
Remember, clear communication prevents last-minute confusion and reduces the risk of accidents!
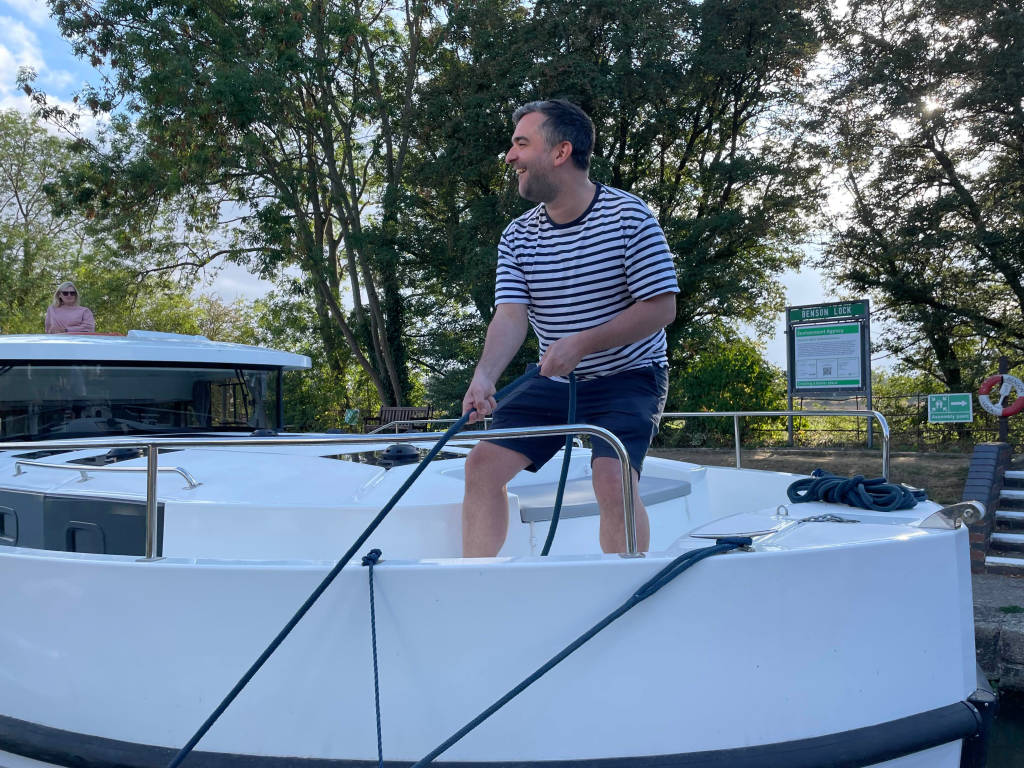
Also, having Rope handler 1 ready to step ashore as soon as the boat reaches the mooring point is essential. This person can secure the bow line to a mooring ring or post quickly and efficiently. Meanwhile, the Captain can focus on controlling the boat’s speed and positioning, preparing fenders and lines in advance to further ensure that the boat can be tied securely. As we say: anyone can do it!
3. Slow down when mooring a boat
Approaching your mooring spot steadily and slowly is crucial for a safe and controlled docking, as it helps you respond to unexpected water movements, wind, or minor misalignments promptly. As you near the quay or bank, gradually reduce your speed and make sure you have enough time to make small adjustments. Keep in mind that manoeuvring a boat requires a lot of patience, and rushing only increases the risk of collisions or awkward positioning.
Parallel and perpendicular techniques for mooring your boat
Parallel mooring and perpendicular mooring are effective techniques to moor your boat efficiently. Slow, deliberate movements and teamwork make these manoeuvres easy, even in challenging conditions. Let’s have a look at what you need to do in both cases.
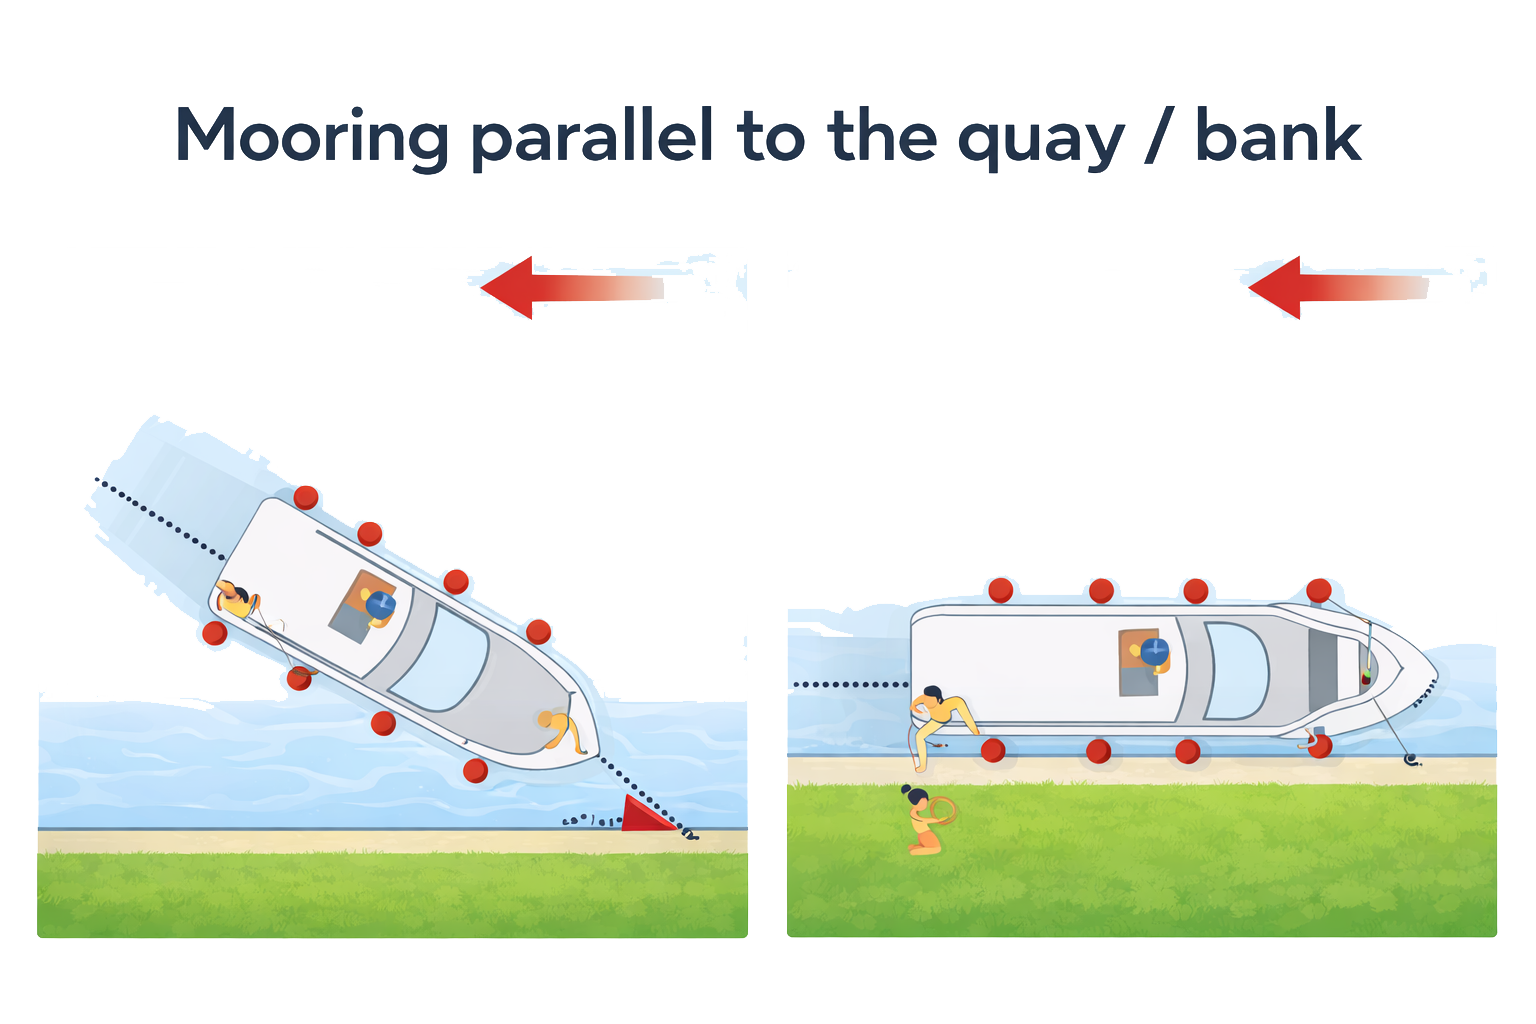
Parallel mooring:
- Position the bow into the wind or current and angle the boat at roughly 45° to the quay or bank.
- As the boat comes within 2-3 metres of the shore, reverse gently to slow down further.
- One crew member can then step ashore to secure the bow while the stern is guided into place.
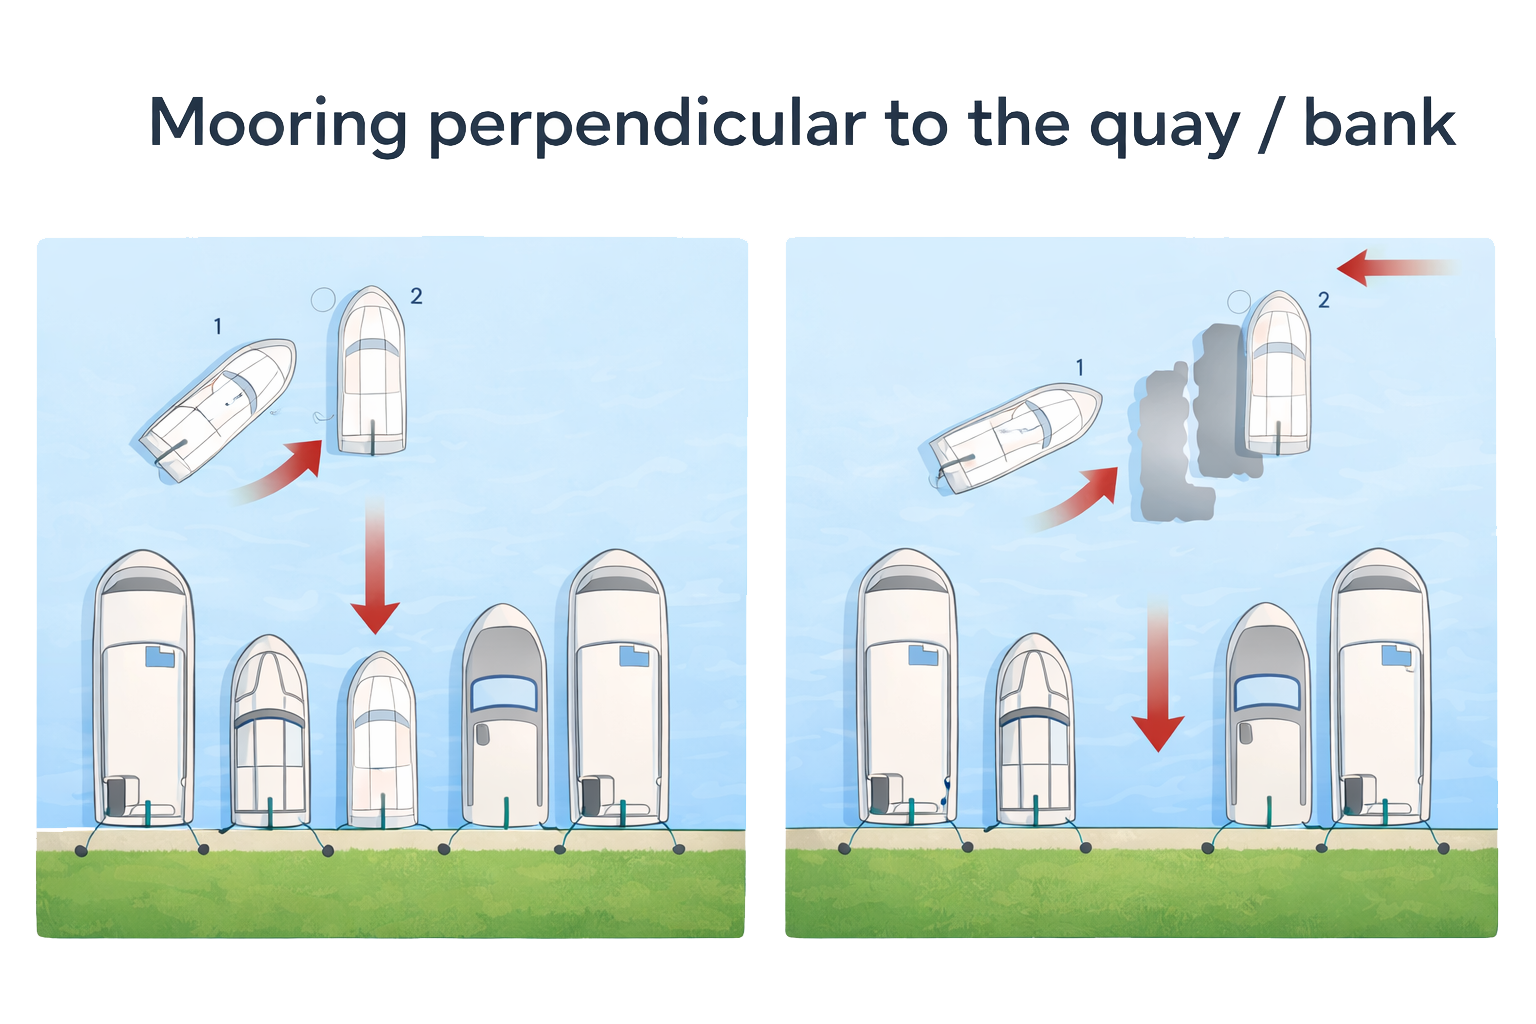
Perpendicular mooring:
- Approach the intended spot closely, then turn and reverse straight into position, taking drift from the wind or current into account.
- A crew member can assist by stepping off to steady lines and help the boat slide into its final position smoothly.
For added control, some of our boats are equipped with a bow thruster, which can make manoeuvring into tight spots even easier, especially in windy conditions or strong currents.
4. The best knots for mooring
Securing your boat properly is the final step in a successful boat mooring. Using the right knot ensures that your boat remains safely in place, even if the water level changes or the wind picks up. For temporary or adjustable mooring, mooring hooks can also be used, though it’s important to keep ropes taut to avoid slack caused by changes in water level.
The key to making every knot successful is practising and knowing when to use each one, making your mooring experience straightforward.
The round turn and two half hitches knot
The round turn and two half hitches knot is one of the most versatile knots for mooring.

- Pass the rope twice around a post or mooring ring to make a round turn, which takes the initial strain off the line.
- Bring the working end of the rope around the standing part and pass it through to form the first half hitch.
- Repeat to make a second half hitch around the standing part to secure the knot.
- For larger boats or stronger currents, add extra turns or additional half hitches for extra security.
The cleat knot
Another effective option includes the cleat knot, ideal for mooring to a cleat.

- Wrap the rope around the base of the cleat once.
- Cross the rope over the top of the cleat in a figure-eight pattern.
- Finish by looping the rope under the last crossover to lock it in place.
The clove hitch knot
The clove hitch is particularly useful for tying to posts or trees, offering a reliable hold while remaining easy to untie.

- Pass the rope around the post or tree.
- Cross the rope over itself and wrap it around the post again.
- Tuck the end under the last wrap and pull tight to secure.
FAQs
No experience is needed. Le Boat shows you exactly how to moor during the pre-departure briefing and provides a Captain’s handbook with clear step-by-step guidance.
Le Boat supplies ropes, fenders, mooring stakes (pins), and a hammer on board. The team explains how and when to use each item during your briefing.
On a Le Boat holiday, mooring means securing your boat to a bank, quay, or pontoon. Anchoring involves dropping an anchor and is not used on rivers and canals.
Le Boat recommends assigning simple roles before you approach the bank, such as who handles the bow line and who assists at the stern. This keeps the mooring calm and straightforward for everyone on board.
Le Boat advises avoiding lock entrances, bridges, blind bends, turning points, and busy traffic areas. Your waterways guide clearly shows safe and approved mooring spots along the route.
Ready to discover Europe and Canada from a new perspective?
No need to worry if you’ve never moored a boat before… with Le Boat, anyone can do it! So, are you ready to get on board and discover 18 stunning destinations across Europe and Canada? When you hire one of our canal or river boats, we show you the ropes during a full pre-departure briefing so you feel confident before setting off on your boating holiday.
Other articles

How to go through a boat lock: step‑by‑step canal lock guide for beginners

Boating etiquette: 8 common courtesies on the water
